by mwonfor | Dec 21, 2022 | Community, Home Maintenance, Homeowners
Plumbing problems can be a major hassle for any homeowner, not to mention costly if you have to call out a professional. Fortunately, you can address many common plumbing issues with basic DIY know-how and the right tools. Check out these five DIY plumbing fixes to get you started.
DIY Plumbing Fixes: Clearing a Clogged Drain
A clogged drain is one of the most common plumbing issues. If water isn’t flowing down your drain, you may have a clog caused by hair, soap scum, or other debris. To fix it, you’ll need a plunger and some elbow grease. First, ensure the tool is fully submerged in water, then push and pull the plunger in a vertical motion to create suction and pressure to clear the clog.
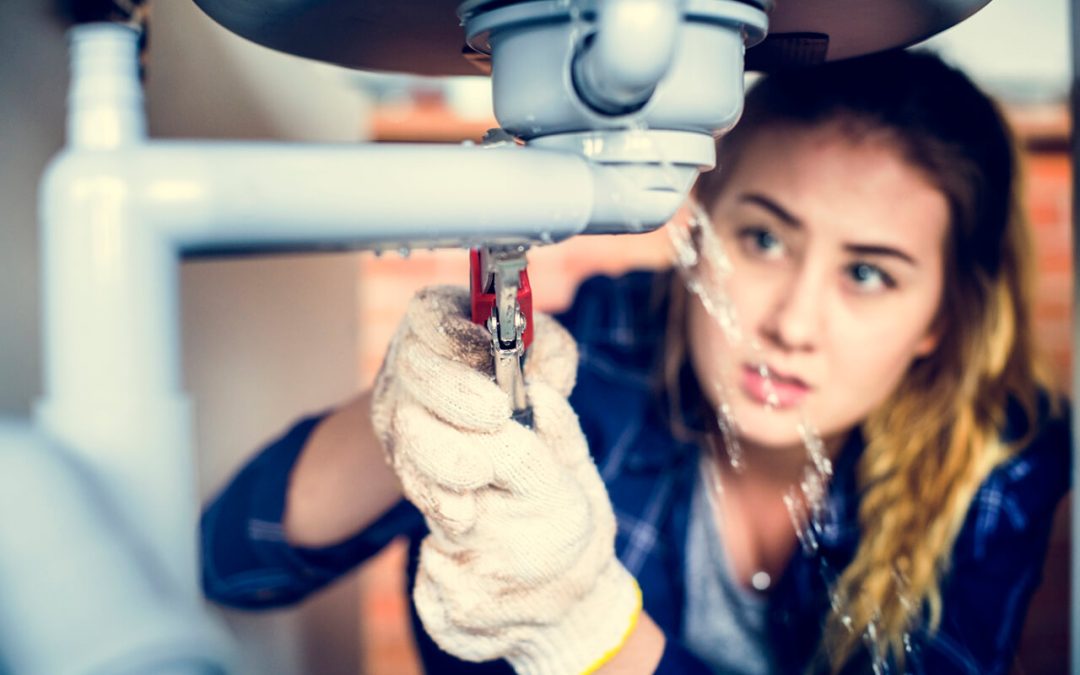
Repairing Leaky Faucets
Dripping faucets are a significant source of wasted water—not to mention the constant “drip, drip” driving you crazy. You’ll need basic tools like a wrench and adjustable pliers to fix a leaky faucet.
Start by turning off the water supply and opening the faucet handles to release any remaining pressure. Then, remove the faucet handle and locate the screw on the handle. Once you have access to the valve stem, replace any corroded or worn parts. Reassemble everything and turn on your water supply to test for success!
DIY Plumbing Fixes: Replacing a Toilet Flapper
A leaking toilet tank might be due to an old or worn-out flapper, the rubber stopper that prevents water from flowing from the tank to your bowl. You’ll need a replacement flapper and pliers (or an adjustable wrench) to replace it.
Start by shutting off the water supply and draining any remaining water from the tank. Then, unhook the chain connecting the handle and remove the old flapper. Install the new one and reattach the flush handle chain, ensuring it’s not too tight or loose. Turn your water supply back on and test to make sure there’s no more leaking!
Installing a New Showerhead
Replacing an old showerhead is surprisingly easy. You’ll need a pair of pliers and some pipe tape. Start by removing the old showerhead. Clean pipe threads with a wire brush and wrap them in pipe tape for extra security. Finally, attach your new showerhead and turn on the water to test it out.
Replacing a Toilet Fill Valve
If your toilet isn’t filling up correctly, you may need to replace the fill valve. You’ll need basic tools like an adjustable wrench, a screwdriver, and possibly some plumber’s putty or Teflon tape.
First, shut off the water supply to the toilet and drain any remaining water in the tank. Then, remove the old fill valve and replace it with a new one. Reattach all hoses and use the plumber’s putty or Teflon tape, if necessary, to form a watertight seal. Turn your water supply back on and test for success!
These simple DIY plumbing fixes should help you tackle some of your home’s most common plumbing issues. If your problem is more than you can handle, don’t hesitate to call a professional plumber to make repairs.
American Home Inspection Services provides inspection in Southeast Michigan. Contact us to schedule an appointment for our services.

by mwonfor | Nov 22, 2022 | Community, Home Improvement, Homeowners
If you’re planning to list your home on the market, make sure you can recoup any money you spend on improvements for the sale. Unfortunately, not all updates are created equal. Let’s discuss four popular home improvement projects that won’t boost property value.
1. Projects that Don’t Boost Property Value: Swimming Pools
While a swimming pool may be a great addition to your home for you and your family, it’s not necessarily a selling point for most buyers. Many potential buyers will see a swimming pool as more of a liability than an asset. Not only do pools require a lot of costly maintenance, but they can also be dangerous, especially for small children. Reconsider adding a pool to your home before putting it on the market.
2. Sunrooms
When it comes to home improvement projects, not all of them are created equal. Some updates – like adding a sunroom – are expensive and add little value to your home. Sunrooms can be pricey to build. Depending on the size and features you want, this addition can cost anywhere from $10,000 to over $50,000. While they might be enjoyable for you and your family to use, a sunroom generally doesn’t offer a good return on investment.
3. Luxury Bathrooms Don’t Boost Property Value
Luxury bathrooms are popular among homeowners. However, they don’t pay for themselves in resale value. Potential buyers shop for homes based on the number of bedrooms and square footage rather than homes with high-end bathroom features. While a new bathroom might make your life more comfortable, it’s not likely to add much value to your home.
4. Custom Closets
Like luxury bathrooms, custom closets have become increasingly popular in recent years. However, they often come at a high price. In addition, custom closets can be difficult to install and may not fit seamlessly into the existing layout of your home. Potential buyers might have a different vision for the use of closet space. For these reasons, custom-designed closets are typically not a good investment when selling your home.
If you’re selling your home soon, choose your home improvement projects wisely. Some projects – like building a swimming pool or installing a sunroom – may offer little return on investment. Instead, focus on projects that appeal to many potential buyers. Paint the exterior of the home or upgrade the kitchen appliances. By making intelligent choices regarding home improvements, you can help ensure that your property sells quickly and at the right price.
American Home Inspection Services offers inspection in Southeast Michigan. Contact us to schedule an appointment for our services.
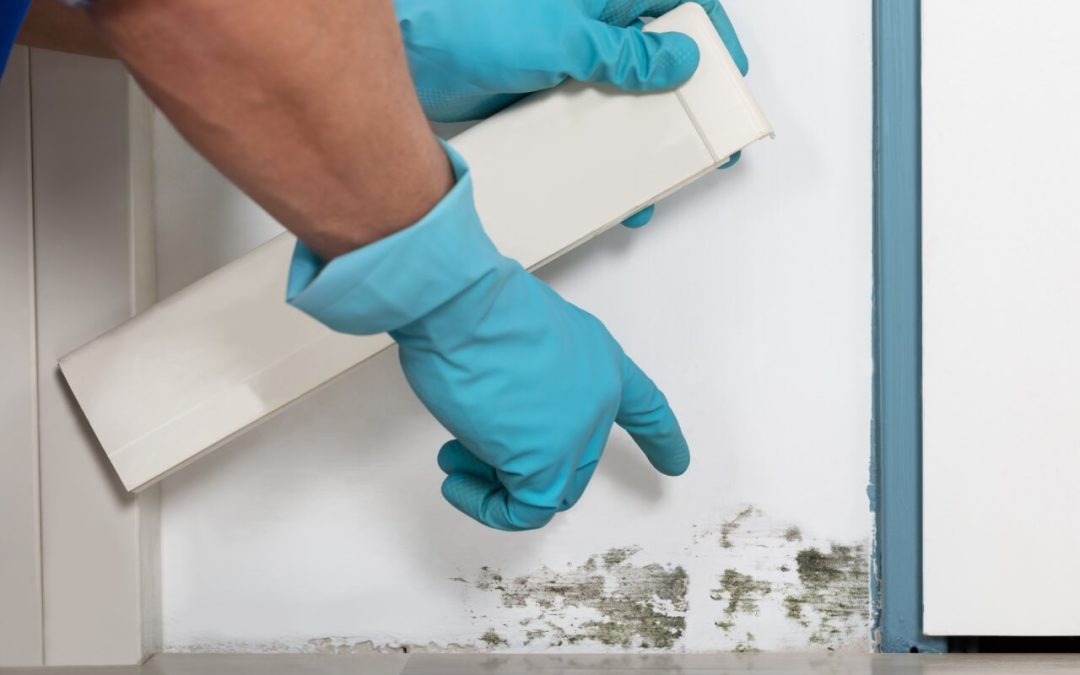
by mwonfor | Oct 21, 2022 | Community, Homeowners, Mold Inspection, Safe and Healthy Home
A damp basement can lead to structural problems and mold growth. If you have a wet basement, your property could be at risk, and mold development might lead to respiratory problems, skin irritation, and other health issues. The good news is that there are things you can do to prevent moisture in your basement. Here are six tips to keep the basement dry and mold-free.
1. Clean the Gutters
Gutters help keep a basement dry by diverting water from the foundation of the house. Clean the gutters regularly to prevent them from becoming clogged and overflowing. Water seeping into the basement can lead to mold growth and structural damage.
2. Grade the Land Around the Home
When it comes to keeping a basement dry, proper grading around the home is critical. When you ensure the ground slopes away from the foundation, water flows away from the house. Good grading will help prevent moisture from seeping into the basement and causing problems.
3. Apply Waterproof Sealant to Basement Walls
While a waterproof sealant can’t guarantee to keep your basement 100% dry, it can help to reduce the amount of water that seeps in.
To apply the waterproof sealant, clean the surface of the walls to remove dirt or debris that could prevent the sealant from adhering correctly. Next, apply the sealant according to the manufacturer’s instructions. Be sure to follow all safety precautions when using any type of chemicals.
Once the sealant is applied, you may notice a difference in the amount of water that seeps into your basement. However, the sealant may take some time to cure and reach its maximum effectiveness.
4. Seal Cracks or Gaps in the Foundation to Keep the Basement Dry
To keep the basement dry, seal foundation cracks to prevent water from seeping into the space and causing damage. There are several ways to seal foundation cracks; choose the best method for your home.
One way to seal foundation cracks is by using caulk. Choose a caulk that is specifically designed for use on concrete. Be sure to clean the crack or gap well before applying the caulk, as this will help it to adhere better. Apply the caulk in a smooth, even line and allow it to dry completely.
Another way to seal foundation cracks is by using epoxy resin. This type of resin is very strong and can provide a lasting seal. As with any product, follow the instructions on the label for the best results.
5. Use a Dehumidifier to Remove Moisture
Dehumidifiers are a great way to keep the basement dry and free of mold. Make sure there is an available electrical outlet to power the appliance. Set the humidity level to 60% or less and allow the machine to do its job. You’ll need to frequently empty the reservoir or attach a hose to the dehumidifier and allow it to drain outdoors.
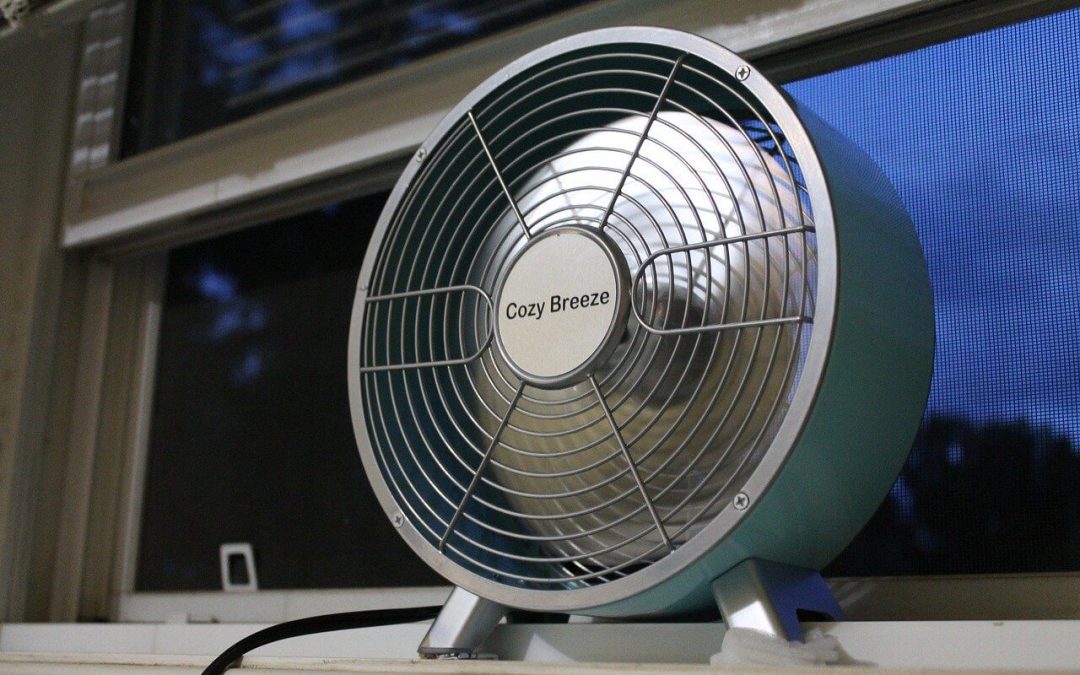
6. Ventilate the Basement to Keep it Dry
If you have a basement, it is essential to ventilate the space to keep it dry. In addition to using a dehumidifier, here are a few tips.
- Use a fan to circulate the air in the basement. Good airflow promotes evaporation and reduces moisture accumulation.
- Open windows and doors when weather permits, allowing fresh air to circulate and helping keep the basement dry.
Following these tips, you can reduce moisture in your basement and keep it dry and mold-free year-round.
American Home Inspection Services provides inspections to homebuyers and sellers including mold inspections in Southeast Michigan. Contact us to request our services.

by mwonfor | Sep 22, 2022 | Community, Homeowners, Safe and Healthy Home
A house fire is a scary prospect for any homeowner. Fire can spread quickly throughout your home, causing extensive property damage, injury, or even death. Luckily, with proper chimney maintenance, you can reduce the risk of fire in your home. Below are four strategies you can implement to prevent chimney fires.
Minimize the Build-up of Creosote to Prevent Chimney Fires
Creosote is undoubtedly one of the leading causes of chimney fires. This highly flammable substance is a by-product of burning in the fireplace. Smoke condenses as it travels up the chimney. If the temperature within the flue is high and the creosote build-up is thick enough, creosote could ignite.
To prevent chimney fires caused by creosote build-up, use only seasoned wood stored in a dry place for at least six months. Before burning the firewood, test the moisture content using a moisture meter which you can purchase online or at hardware stores. Don’t burn freshly cut wood because it produces more smoke and creosote. Keep the damper open when using the fireplace to allow adequate airflow.
If your chimney is not insulated, hire a professional to insulate it. A well-insulated liner prevents the temperatures in the flue from getting too cold – an environment that leads to creosote formation when the smoke condenses quickly.
Schedule a Professional Chimney Inspection
Many defects that lead to chimney fires, like a damaged flue liner, aren’t usually visible to the naked eye. To promote safety, have a professional inspect and clean the chimney at least once per year.
An expert will check the chimney and notify you of any signs of damage. You’ll be able to schedule necessary repairs before the issue becomes more severe.
Clean Your Chimney
Before building the first fire of the season, ensure the chimney is clean. You’ll reduce the risk of fire by removing flammable materials like leaves, pine needles, animal nests, and creosote from the flue. You can clean your chimney yourself using a chimney brush and a ladder. However, it’s always preferable to let a professional handle this task. They have the tools necessary to eliminate soot, creosote, and other debris that has accumulated in your chimney.
Check the Cap to Prevent Chimney Fires
Another great way to prevent chimney fires is by making sure that you have a functioning cap. A chimney cap helps to keep debris, pests, and rainwater out of your chimney. It also helps to prevent backdrafts, where smoke from a fire re-enters the home as the wind blows down the chimney. If your chimney cap is loose, missing, or damaged, replace it before using the fireplace.
Fireplaces are a convenient source of heat during the cold months and can help you save on energy bills, but they can be dangerous if you don’t take proper precautions. Use these prevention tips to protect your loved ones from chimney fires.
American Home Inspection Services offers inspections to homebuyers and sellers in Southeast Michigan. Contact us to request our services.

by mwonfor | Aug 23, 2022 | Community, Homeowners
Yearly roof maintenance can prevent minor issues from becoming large and expensive problems. Regularly cleaning and inspecting the roof guarantees that your investment lasts as long as possible. Inspect your roof after strong storms or at least twice yearly, once in spring and once in fall.
Assess the Condition of Your Roof
Only those capable of safely climbing a ladder should examine the roof. Depending on the slope, it may be difficult to walk on. Professional roofers can perform inspections safely, and they are less likely to miss an issue. Whether you hire a professional or do it yourself, this checklist will highlight what to look for.
Yearly Roof Maintenance Checklist
Inside Your Home
Start your yearly roof check-up inside the house. Examine interior walls and ceilings for any signs of water. If there is staining on the wall or ceiling, this could indicate a leak in the roof. Mildew and mold are signs the area has been damp for some time. Notice if there are areas where the ceiling seems to be sagging, indicating rot caused by water damage.
Clear the Gutters
Cleaning gutters is an essential part of roof maintenance. Clogged gutters and downspouts lead to water pooling on the roof. Remove debris and use a garden hose to check the flow of water. Water should drain away from the house, not near the foundation. Look for rust spots or leaks in the gutter. Make necessary repairs as soon as possible. Rust erodes the guttering material, causing water to leak in undesired areas.
Exterior Roof Maintenance
Walk the roof and remove any debris. Check for missing tiles or shingles, and replace them as soon as possible. If any tiles or shingles are broken or damaged, replace them. For metal roofs, keep an eye out for rust. For wooden roofs, look for areas that are sagging or appear soft, a sign of rot. Repair or replace these areas before the damage becomes worse.
During your yearly roof maintenance, pay attention to features on the roof, such as solar panels, the satellite dish, or the chimney. Make sure the roof beneath the extra weight is sturdy, and verify that the seals around the chimney are in good shape.
By completing yearly roof maintenance, you extend the life of your roof and prevent leaks and water damage.
American Home Inspection Services provides inspection services in Southeast Michigan. Contact us to schedule an appointment.
by mwonfor | Jul 25, 2022 | Community, Homeowners
Energy conservation lowers your monthly utility expenses and positively impacts the environment. If you’re looking to save energy at home, here are a few simple changes you can start implementing today.
Switch Off the Air Conditioner to Save Energy at Home
If the weather is hot or humid, your first move may be to turn on the air conditioner. But save the AC for sweltering hot days if you’re trying to conserve energy. Instead, hang blackout curtains to block the sun’s rays from warming your home. Use a fan, especially during cooler parts of the day, to circulate the air, creating a wind-chill effect.
Set a reminder to adjust the thermostat or turn off the air conditioner altogether when no one is home. Install a smart thermostat that can be managed via your smartphone to control your home’s temperature from anywhere.
Be Efficient with Appliance Usage
Only run the dishwasher and washing machines when you have a full load of laundry or dishes. Save even more energy by using cold water instead of hot when washing the laundry. Most modern detergents and machines work just as well with cold water, and you’ll prevent clothing from fading.
If you tend to fall asleep in front of the television, set a timer to automatically turn it off at a specific time.
Hang Laundry to Dry
You can save even more energy when doing your laundry by air drying your clothes instead of using the machine. Even if you can’t air dry every time you do your laundry, consider skipping the dryer sometimes, especially when the weather is warm. Hang clothes outside on a clothesline to dry.
Use the Oven Less Frequently to Save Energy at Home
Cooking at home has a lot of advantages, and it tends to be healthier and less expensive. But if you’re trying to save energy, look into recipes that don’t require the oven, such as salads, smoothies, cold sandwiches, or no-bake cookies.
Unplug Devices
Some devices use power while plugged in, even if powered off. Reduce your energy usage by unplugging appliances and devices you’re not using. For example, there is no reason to leave the microwave, blender, computer, or tablet plugged in around the clock.
Replace Your Light Bulbs
If you’re looking for an easy way to save energy at home, replace traditional incandescent light bulbs with LEDs. These modern bulbs are more energy-efficient and longer-lasting than standard light bulbs.
American Home Inspection Services provides inspection services in Southeast Michigan. Contact us to schedule an appointment.